
A few weeks ago, I built a new workstation with somewhat beefy AMD Ryzen 3950x CPU and got a bit over-excited with
tuning it and getting the max (trying to reduce rust compile times) out of it 😅. One thing led to
another and I ended up with a Corsair H150i RGB PRO XT AIO to keep this thing cool enough.
Everything worked well until I found out that Corsair does not provide any support for Linux 🙄.
It was usable, as this device holds its config on board and does not need support from OS/Software to run,
but one can only adjust any settings or view any status in Windows.
How do I use this device in Linux? I wanted to look at the useless but pretty stats about how fast the
pump and fans are spinning, what is the temperature of the coolant? After all I gotta kill time when
ferris is churning bits…
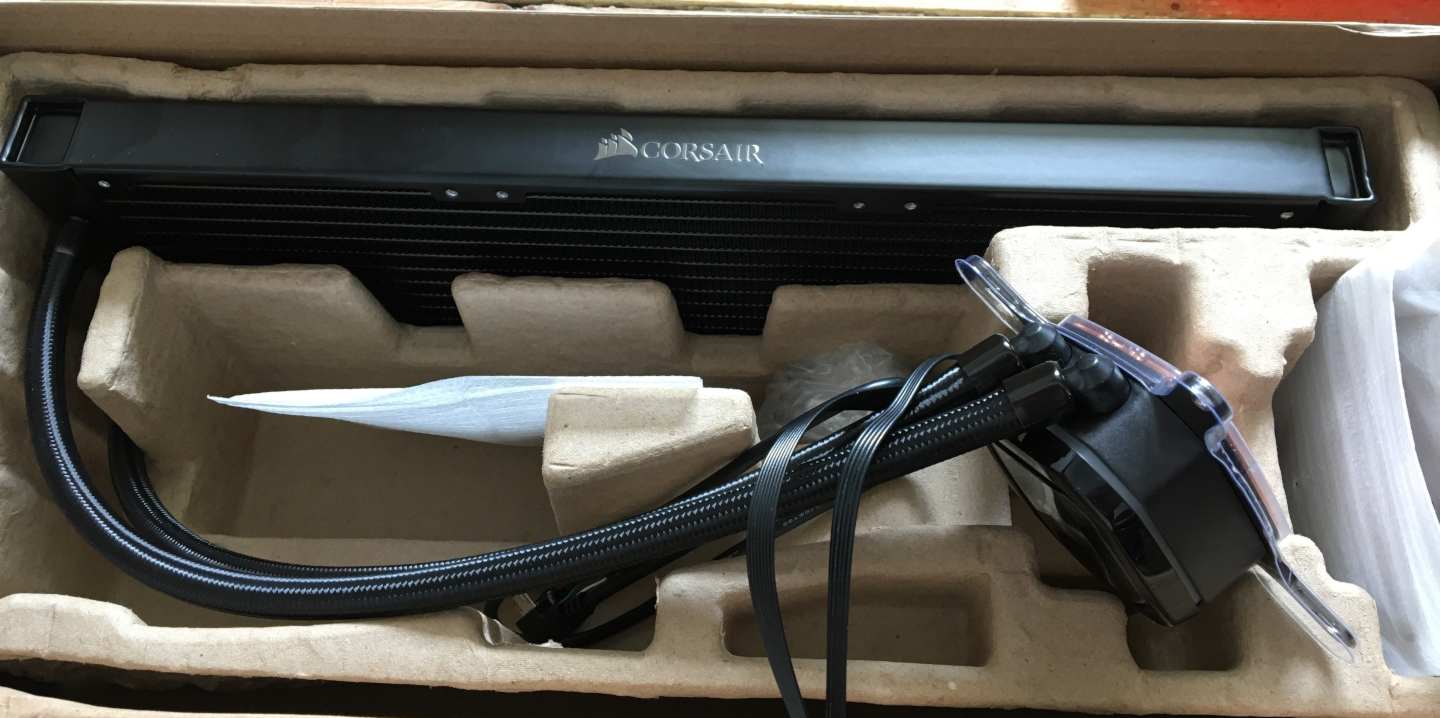
The Device in question
Where to start?
My very first thought was to sniff the communication between the software and the device and replicate it, problem solved! That is what I ended up doing but it wasn’t easy. I started with searching and asking for help on twitter.
I had no idea how USB devices work, apart from you plug them in and they play. I started reading up on USB protocol. Here are some resources that I found very useful to get me started with reverse engineering and understanding USB protocol in general.
- Usb Made Simple
- DRIVE IT YOURSELF: USB CAR
- libusb documentation
- usb and libusb (video)
- reverse engineering USB devices (video)
- USB3 Specifications (PDF)
- USB Complete 5th Edition (book)
In a nutshell USB is completely controlled by the host, it will sit there until host device makes a request for a Transaction. To control a device we need to take these steps (I’m over-simplifying here) get device info -> configure its endpoint -> run a command. Don`t worry if it doesn’t make sense for now it didn’t for me either, hopefully it will start to make sense at the end of this article. I strongly recommend to go thorough the resources above to help with the process.
Before we can reverse engineer a device we need to understand what it does and how it does. I started with capturing packages, because it was supported only on windows I created a VM. After a few unsuccessful attempts to install the software provided by Corsair in the VM (it required OpenGl for some reason). I ended up setting up a dual boot for Windows. After some duckduckgoing (if that’s even a word) I installed Wireshark and USBPcap to capture the USB traffic when the software was reading stats information off the device. I still couldn’t see any USB interfaces listed in Wireshark to capture. But I could use USBPcap command line tool to capture packets flying back and forth, between my AIO and the PC. That was Ok but not ideal as I could not see live packets to see what packet is transferred when the values changed in the Corsair software. Later on, I found the following tip buried in one of the youtube video comments and it worked.
for live capture USB packets in wireshark, copy
USBPcapCMD.exeintowireshark\extcapdirectory
Now I had the needed data, and ‘commands’ that i could try to replicate. As you can see in the screenshot
below it is a sequence of commands GET DESCRIPTOR for DEVICE and then Configuration and various
other requests and responses. Later on we’ll see that after the initial setup it is just a couple of alternating
request are made to the device to receive sensor data. Corsair software parses the response and displays fan/pump
speeds and coolant temperature etc we’ll get to that later but lets setup our project in rust.
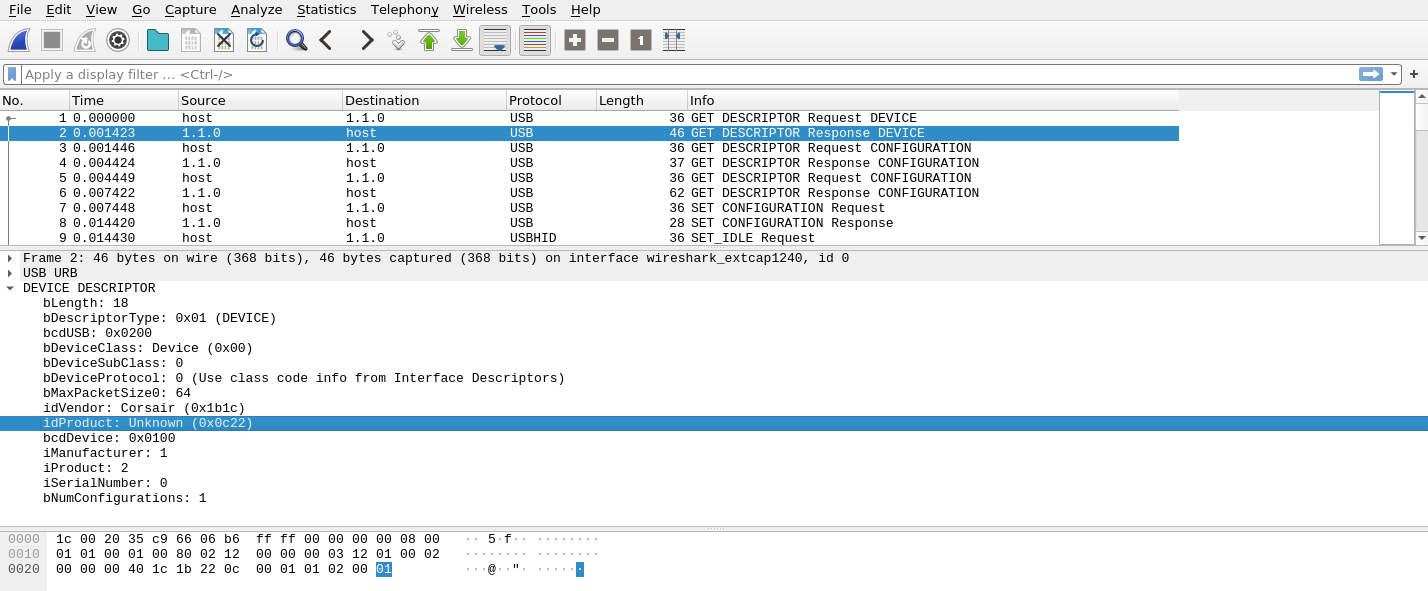
packet capture from wireshark
Setting up a rust project
On my Linux machine I ran lsusb to see the usb devices attached, and there it was
Bus 001 Device 002: ID 1b1c:0c22 Corsair H150iRGBPROXT, vendor and product IDs matching with the captured
data as expected.
I started a new rust project cargo new rcue named it rcue just because the software I’m
trying to replicate is called iCue 😜. Some awesome rust developers have already made a rust crate
rusb
that provides safe bindings for libusb-1.0. For this project we only
need two dependencies as following.
[dependencies]
rusb = "0.6"
byteorder = "1.3"
byteorder is an awesome crate, it will become handy as we see later. I looked at the examples provided
by the rusb repo
here
and started with just
reading some basic information about the device.
If you have problem compiling this see instructions here libusb-sys
use rusb::{Context, Device, DeviceHandle, Result, UsbContext};
use std::time::Duration;

// device uid pid are picked directly form `lsusb` result
const VID: u16 = 0x1b1c;
const PID: u16 = 0x0c22;

fn main() -> Result<()> {
    let mut context = Context::new()?;
    let (mut device, mut handle) =
        open_device(&mut context, VID, PID).expect("Failed to open USB device");

    print_device_info(&mut handle)?;
    Ok(())
}

fn open_device<T: UsbContext>(
    context: &mut T,
    vid: u16,
    pid: u16,
) -> Option<(Device<T>, DeviceHandle<T>)> {
    let devices = match context.devices() {
        Ok(d) => d,
        Err(_) => return None,
    };

    for device in devices.iter() {
        let device_desc = match device.device_descriptor() {
            Ok(d) => d,
            Err(_) => continue,
        };

        if device_desc.vendor_id() == vid && device_desc.product_id() == pid {
            match device.open() {
                Ok(handle) => return Some((device, handle)),
                Err(_) => continue,
            }
        }
    }

    None
}

fn print_device_info<T: UsbContext>(handle: &mut DeviceHandle<T>) -> Result<()> {
    let device_desc = handle.device().device_descriptor()?;
    let timeout = Duration::from_secs(1);
    let languages = handle.read_languages(timeout)?;

    println!("Active configuration: {}", handle.active_configuration()?);

    if !languages.is_empty() {
        let language = languages[0];
        println!("Language: {:?}", language);

        println!(
            "Manufacturer: {}",
            handle
                .read_manufacturer_string(language, &device_desc, timeout)
                .unwrap_or("Not Found".to_string())
        );
        println!(
            "Product: {}",
            handle
                .read_product_string(language, &device_desc, timeout)
                .unwrap_or("Not Found".to_string())
        );
        println!(
            "Serial Number: {}",
            handle
                .read_serial_number_string(language, &device_desc, timeout)
                .unwrap_or("Not Found".to_string())
        );
    }
    Ok(())
}
If everything goes well you’ll see the following result, depending on your system setup, you might need to run it with sudo.
Active configuration: 1
Language: Language { raw: 1033 }
Manufacturer: Corsair Inc.
Product: H150iRGBPROXT
Serial Number: Not Found
create a usb device rule file
/etc/udev/rules.d/75-corsair-aio.ruleswith lineSUBSYSTEM=="usb", ATTRS{idVendor}=="1b1c", ATTRS{idProduct}=="0c22", TAG+="uaccessand reboot, this will allow this particular device to be accessed without root privileges.
Configuring USB device
Back to our captured data, if I filter the direction of all data going to the device, I can see a sequence first three packets are for requesting information, presumably to confirm that we are connected to the required device. Forth request (7th if you count responses) in the screenshot below is doing something. I think it’s configuring the device endpoint. A USB device can be configured in many different ways as you might have seen/read in the resources above. Since our device only has one configuration as confirmed in the output of our program, there is no real point re-configuring it to the same one, but we’ll do it anyway for the completeness sake.
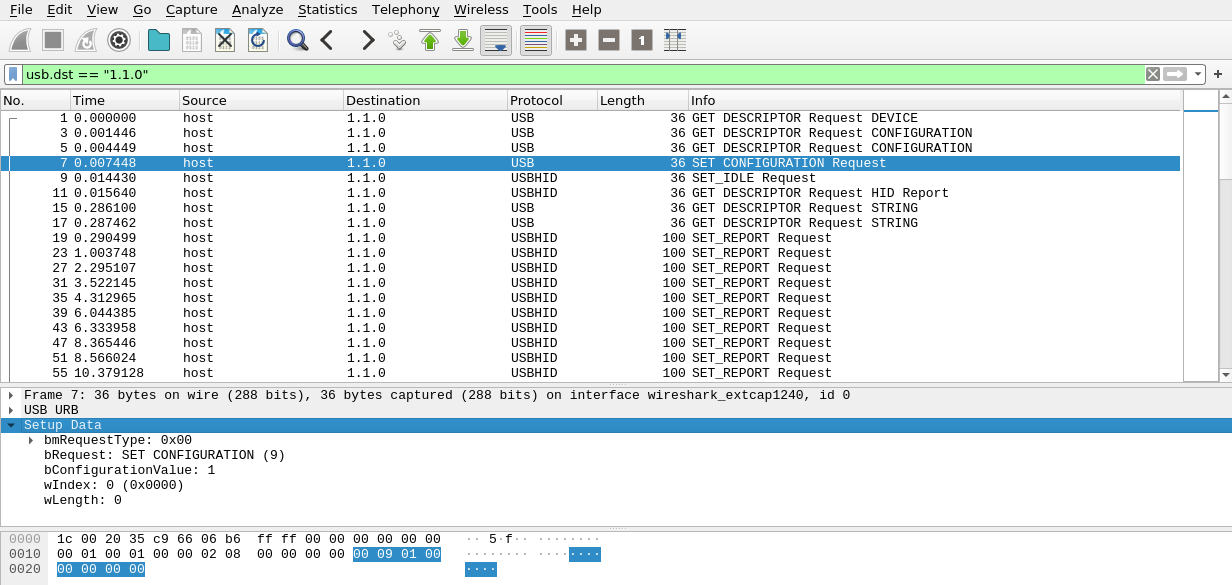
The relevant piece of information here are the data that is sent or the last 9 bytes. Let’s try replicating this in our program. To configure the device properly we need to claim it. That require some extra information for the attached device i.e. its interface, settings and address identifiers. Let’s setup a function like the following.
#[derive(Debug)]
struct Endpoint {
    config: u8,
    iface: u8,
    setting: u8,
    address: u8,
}

// returns all readable endpoints for given usb device and descriptor
fn find_readable_endpoints<T: UsbContext>(device: &mut Device<T>) -> Result<Vec<Endpoint>> {
    let device_desc = device.device_descriptor()?;
    let mut endpoints = vec![];
    for n in 0..device_desc.num_configurations() {
        let config_desc = match device.config_descriptor(n) {
            Ok(c) => c,
            Err(_) => continue,
        };
        // println!("{:#?}", config_desc);
        for interface in config_desc.interfaces() {
            for interface_desc in interface.descriptors() {
                // println!("{:#?}", interface_desc);
                for endpoint_desc in interface_desc.endpoint_descriptors() {
                    // println!("{:#?}", endpoint_desc);
                    endpoints.push(Endpoint {
                        config: config_desc.number(),
                        iface: interface_desc.interface_number(),
                        setting: interface_desc.setting_number(),
                        address: endpoint_desc.address(),
                    });
                }
            }
        }
    }

    Ok(endpoints)
}
USB devices can have multiple endpoints but in our case there is only one, if you print it to terminal it looks something like
Endpoint { config: 1, iface: 0, setting: 0, address: 129 }
Now lets claim and configure our device with the information we have. We also need to disable the default Linux USB driver if it is attached at the beginning of our program and attach it at the end when we release the device. At this stage code looks like this
...
...
fn main() -> Result<()> {
    let mut context = Context::new()?;
    let (mut device, mut handle) =
        open_device(&mut context, VID, PID).expect("Did not find USB device");

    print_device_info(&mut handle)?;

    let endpoints = find_readable_endpoints(&mut device)?;
    let endpoint = endpoints
        .first()
        .expect("No Configurable endpoint found on device");

    let has_kernel_driver = match handle.kernel_driver_active(endpoint.iface) {
        Ok(true) => {
            handle.detach_kernel_driver(endpoint.iface)?;
            true
        }
        _ => false,
    };
    println!("has kernel driver? {}", has_kernel_driver);

    // claim and configure device
    configure_endpoint(&mut handle, &endpoint)?;
    // control device here

    // TODO

    // cleanup after use
    handle.release_interface(endpoint.iface)?;
    if has_kernel_driver {
        handle.attach_kernel_driver(endpoint.iface)?;
    }
    Ok(())
}

fn open_device<T: UsbContext>(
    context: &mut T,
    vid: u16,
    pid: u16,
) -> Option<(Device<T>, DeviceHandle<T>)> {
...
}

fn print_device_info<T: UsbContext>(handle: &mut DeviceHandle<T>) -> Result<()> {
 ...
}

// returns all readable endpoints for given usb device and descriptor
fn find_readable_endpoints<T: UsbContext>(device: &mut Device<T>) -> Result<Vec<Endpoint>> {
 ...
}

fn configure_endpoint<T: UsbContext>(
    handle: &mut DeviceHandle<T>,
    endpoint: &Endpoint,
) -> Result<()> {
    handle.set_active_configuration(endpoint.config)?;
    handle.claim_interface(endpoint.iface)?;
    handle.set_alternate_setting(endpoint.iface, endpoint.setting)
}
Sending commands to the device
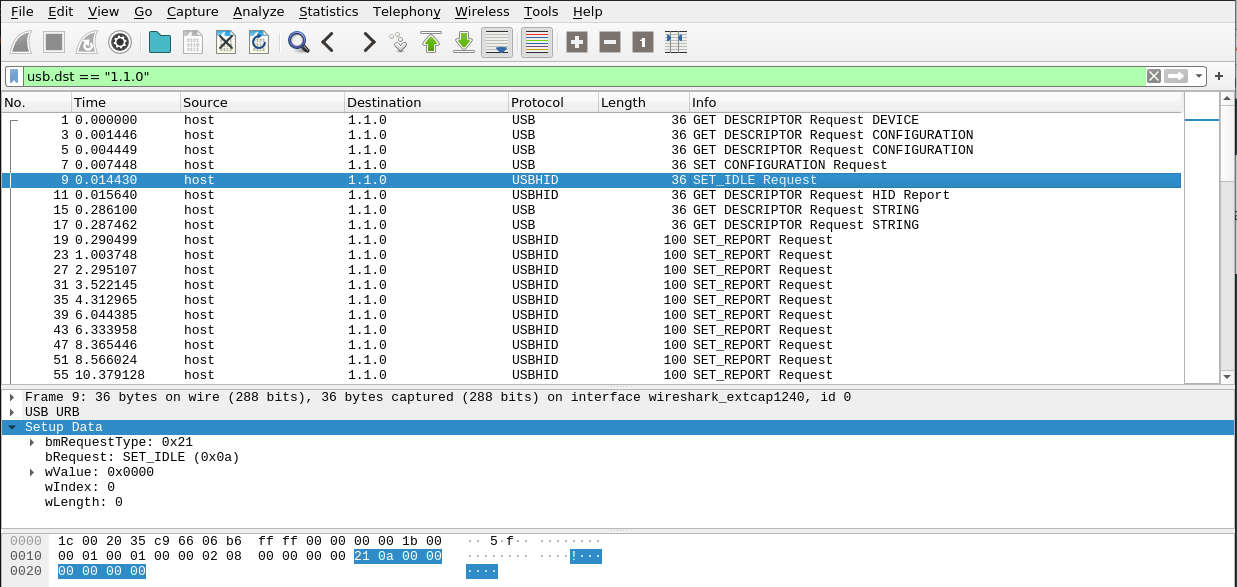
Back to our captured data, next command in line is SET_IDLE, its very similar to configure
but last 8 bytes are important to set this command, see below.
unlike set_active_configuration we need to send these bytes manually, libusb has has a write_control(...)
method for this purpose. Although I could not get this to work, device always returns
Pipe which is an Error in USB talk. Fortunately we can still get it to work. here is the method I used if you
know what’s wrong with it please let me know via Mastodon or reddit etc.
// 🐛🐛🐛🐛
fn set_idle<T: UsbContext>(handle: &mut DeviceHandle<T>) -> Result<usize> {
    let timeout = Duration::from_secs(1);
    // Const values are picked directly from the package capture data
    const REQUEST_TYPE: u8 = 0x21;
    const REQUEST: u8 = 0x0A;
    const VALUE: u16 = 0x0000;
    const INDEX: u16 = 0x0000;
    handle.write_control(REQUEST_TYPE, REQUEST, VALUE, INDEX, &[], timeout)
}
Even though SET_IDLE didn’t work, I continued with subsequent requests. If you have followed along
this far you’d be glad to know we are very close to get something meaningful (at least in the form of bytes) out from it.
after this we have repeating commands going back and forth first is sending SET_REPORT with 64 bytes of data
then followed by an URB_INTERRUPT command receiving 64 bytes from the USB. See below
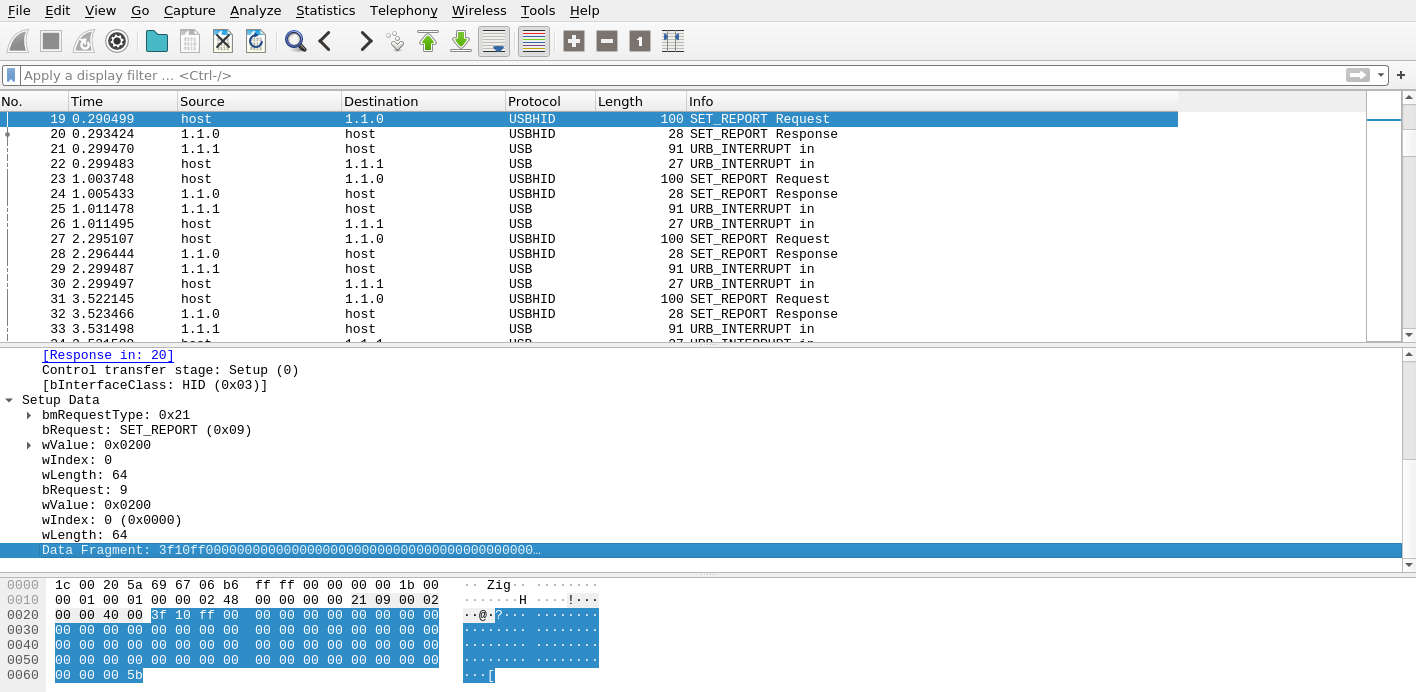
set report request
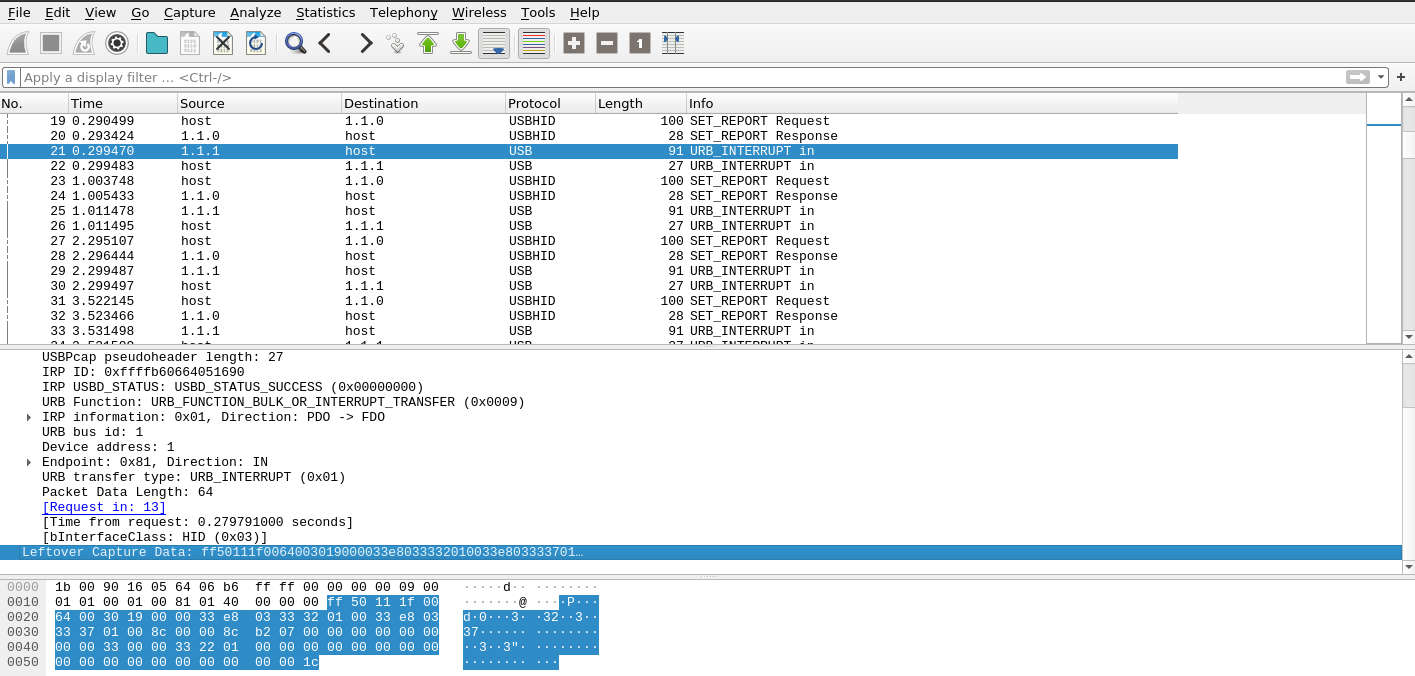
get interrupt request
The word ‘INTERRUPT’ might be a bit confusing, its not like other Micro controller interrupts as one
might expect. As I mentioned earlier USB is controlled by the host, so ‘INTERRUPT’ is still a request
that we need to send to the device to get data back. Lets make two methods one to send SET_REPORT
with the bytes that we copy from the above capture and another one to send URB_INTERRUPT with 64 bytes of buffer
to receive data.
fn main(){
  ...
    set_report(&mut handle)?;
    let data = read_interrupt(&mut handle, endpoint.address)?;
    println!("{:02X?}", data);
  ...
}
...
fn set_report<T: UsbContext>(handle: &mut DeviceHandle<T>) -> Result<usize> {
    let timeout = Duration::from_secs(1);

    // values are picked directly from the captured packet
    const REQUEST_TYPE: u8 = 0x21;
    const REQUEST: u8 = 0x09;
    const VALUE: u16 = 0x0200;
    const INDEX: u16 = 0x0000;
    const DATA: [u8; 64] = [
        0x3f, 0x10, 0xff, 0x00, 0x00, 0x00, 0x00, 0x00, 0x00, 0x00, 0x00, 0x00, 0x00, 0x00, 0x00,
        0x00, 0x00, 0x00, 0x00, 0x00, 0x00, 0x00, 0x00, 0x00, 0x00, 0x00, 0x00, 0x00, 0x00, 0x00,
        0x00, 0x00, 0x00, 0x00, 0x00, 0x00, 0x00, 0x00, 0x00, 0x00, 0x00, 0x00, 0x00, 0x00, 0x00,
        0x00, 0x00, 0x00, 0x00, 0x00, 0x00, 0x00, 0x00, 0x00, 0x00, 0x00, 0x00, 0x00, 0x00, 0x00,
        0x00, 0x00, 0x00, 0x5b,
    ];

    handle.write_control(REQUEST_TYPE, REQUEST, VALUE, INDEX, &DATA, timeout)
}

fn read_interrupt<T: UsbContext>(handle: &mut DeviceHandle<T>, address: u8) -> Result<Vec<u8>> {
    let timeout = Duration::from_secs(1);
    let mut buf = [0u8; 64];

    handle
        .read_interrupt(address, &mut buf, timeout)
        .map(|_| buf.to_vec())
}
If still working, it would print something like
[FF, 60, 11, 1F, 10, 01, 00, 40, 1B, 00, 00, 6D, E8, 03, 6D, E4, 03, 00, 6D, E8, 03, 6D, D0, 03, 00, 8C, 00, 00, 8C, B3, 07, 00, 00, 00, 00, 00, 00, 00, 00, 6D, 00, 00, 6D, 28, 04, 00, 00, 00, 00, 00, 00, 00, 00, 00, 00, 00, 00, 00, 00, 00, 00, 00, 00, EB]
The Frustration
WOOHOO! I have data back from the USB. This was the most exciting and then after frustrating point in the whole exercise. I spend night on this so maybe you don’t have to 😜.
When I captured the data in Windows, I copied the values what was being displayed on the Corsair software.
I had three different fan speed values, pump speed and temperature of the coolant. You might know
what you would do here, but I didn’t. Anyway then I stumbled upon this fantastic online
hex editor
and started looking for the needle in haystack. After a few unsuccessful tries with copy pasting hex dump for each response,
I uploaded the entire capture dump and searched for the
values, with some luck I was able to locate that the Fan1 rpm was an u16 value using 16th and 17th byte in the response.
Similarly I found Fan2 and Fan3 values starting at 23rd and 42nd byte, while pump was located at 30th byte. Who knew??
With a little helper function one could print the nice values using byteorder crate
fn print_data(data: Vec<u8>) {
    let mut rdr = Cursor::new(data);
    rdr.set_position(15);
    println!(
        "Fan 1: {:?} rpm",
        rdr.read_u16::<LittleEndian>().unwrap_or_default()
    );


    rdr.set_position(22);
    println!(
        "Fan 2: {:?} rpm",
        rdr.read_u16::<LittleEndian>().unwrap_or_default()
    );

    rdr.set_position(43);
    println!(
        "Fan 3: {:?} rpm",
        rdr.read_u16::<LittleEndian>().unwrap_or_default()
    );

    rdr.set_position(29);
    println!(
        "Pump : {:?} rpm",
        rdr.read_u16::<LittleEndian>().unwrap_or_default()
    );
}
Active configuration: 1
Language: Language { raw: 1033 }
Manufacturer: Corsair Inc.
Product: H150iRGBPROXT
Serial Number: Not Found
has kernel driver? true
[FF, 70, 11, 1F, 10, 01, ...]
Fan 1: 993 rpm
Fan 2: 973 rpm
Fan 3: 1061 rpm
Pump : 1966 rpm
As far as the temp go I tried my best to look but couldn’t get a clue where that data is. I sent an email to the Corsair support team asking the USB spec for the device, as it lacked support for my platform of choice. A couple of days later they replied with an apology and apparently raised the issues with product managers. I was left on my own.
I tried a few things including trying to convert all bytes to f32 and f64.
Unfortunately nothing looked like a temperature value that I was expecting. From experience I knew
it should be a floating point value somewhere between 25 and 30.
The Solution
I use
watch
as one of my regular tools to repeatedly run and watch
other commands. It has an option -d where it highlights the diff output from previous run. I printed
the hex values on the terminal, while omitting the values I knew could not be temperature.
Ran watch -d cargo run and started watching…
One by one I omitted the bytes that were not changing at all or were changing at every single read as I knew that coolant temps don’t change as much they move up and down slowly. To make that change I ran a stress test on the system and periodically blocked the airflow of the radiator to trigger in temperature rise.

Eyeballing the bytes 👀
After a lot of trial and error I had a candidate, byte no 9. To my surprise byte 10 didn’t correspond to the changes the same way. Anyway I printed te 9th byte to the terminal and it WAS the temp in °C. Some success at last, I could read and print temps in full °C while confirming it with raising temps artificially. I could have called it a day and be happy, but tinkerer inside me still want to look for the fractional value.
Long story short, I found that 8th byte went up and down crazy when I played with the temps. I printed it and it didn’t make sense initially,
but after tinkering for a while I came up with a [slightly wrong] formula byte9 + (byte8/255) and it gave me the desired results.
I added the last piece of the puzzle (for now) to the print function.
// 🐛🐛🐛🐛
fn print_data(data: Vec<u8>) {
    let byte8 = data[7] as f32;
    let byte9 = data[8] as f32;
    println!("Temp : {:.2}°C", byte9 + byte8 / 255.0);
    ...
}
UPDATE: As suggested by this reddit comment better version for reading the temps is
fn print_data(data: Vec<u8>) {
    let mut rdr = Cursor::new(data);
    rdr.set_position(7);
    println!(
        "Temp : {:.2}°C",
        rdr.read_u16::<LittleEndian>().unwrap_or_default() as f32 / 256.0
    );
...
}
Result
Temp : 26.95°C
Fan 1: 940 rpm
Fan 2: 933 rpm
Fan 3: 992 rpm
Pump : 1971 rpm
Resources
Maybe Upcoming
[Un]fortunately I have moved on to a custom loop cooling solution, therefore no need for me to keep hacking on the Corsair AIO. On the upside, a very cool opensource project liquidctl has been mentioned by many of the readers. Please check it out for a more complete AIO controller solution.